4 of the Best Arches in Arches National Park + Free Downloadable 24-Hour Arches Itinerary
Ahhh Arches National Park. Where 2,000 sandstone arches reach majestically into the sky, seemingly defying the laws of physics with every formation. It’s no wonder 1.5 million visitors go out of their way to experience this Utah park every year.
Read on for the best arches in Arches, and how to make the most of just 24 hours exploring this 119-square-mile National Park.
Hey, friends! I love recommending the gear that I'm stoked about and use on the regular. As such, this post contains affiliate links to some of the products I love, and I'll receive a small commission upon any purchases made through those links at no additional expense to you. That income helps support my website and keeps it free!
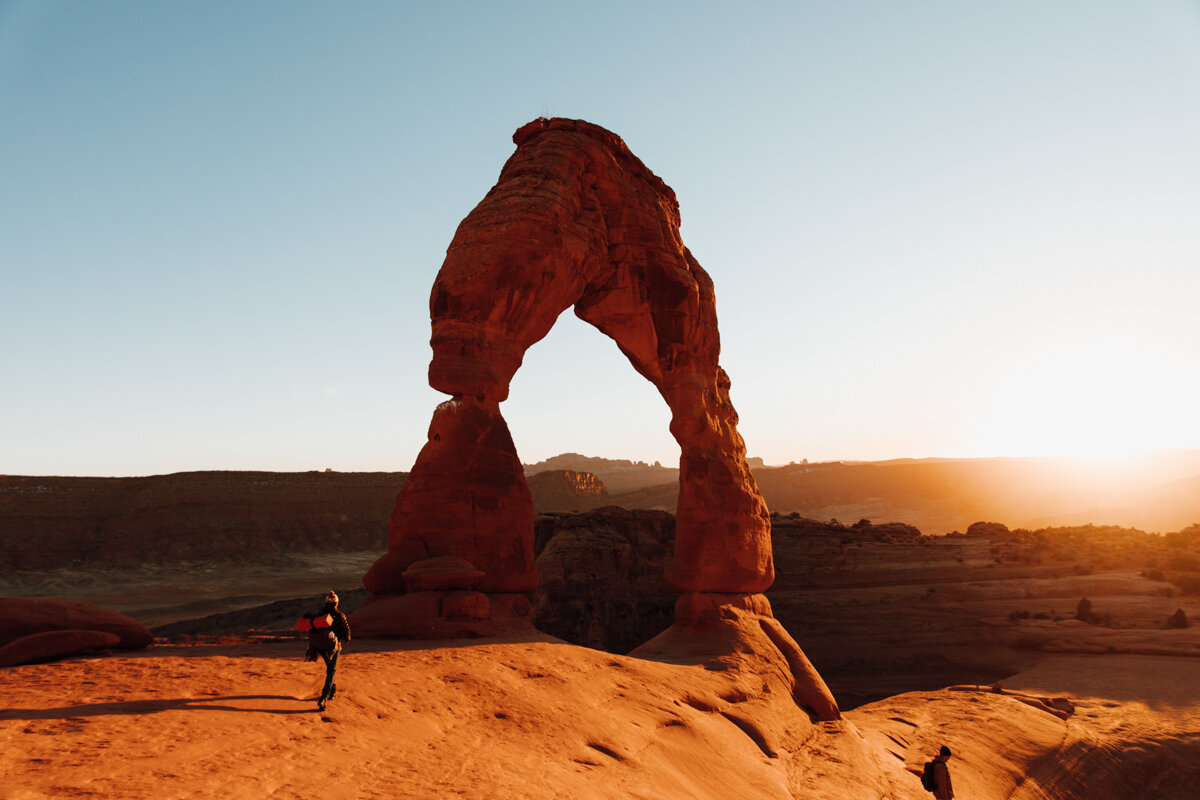
Table of Contents
At A Glance:
Location: Moab, Utah
Size: 119 square miles
Entrance Fees/Permits: National Park Pass ($30 per private vehicle, $55 for a Southeast Utah Parks Pass, or $80 for an America the Beautiful Pass, which gets you to all National Parks. I recommend the last one!)
Native Lands: Núu-agha-tuvu-pu (Ute)
Open: Year-round
Activities: Hiking, backpacking, climbing, biking, camping, horseback riding, canyoneering, stargazing
SOME SERVICES ARE STILL LIMITED DUE TO COVID. Arches National Park roads, trails, campground, and park bookstore are open. The Fiery Furnace, museum exhibits, and theater are closed. Check www.nps.gov for updates.

Know Before You Go
Getting to Arches
Arches is just a 10-minute drive north of Moab, the closest city to the park.
When’s the best time to go?
Fall or winter! Not only will you avoid the swelteringly hot summer months and higher risk of heat exhaustion, but winter also means less crowds! You’ll have some hikes totally to yourself while lessening the human impact on trail erosion caused by overcrowding in summer months.
Entrance Fees

Download now!
It’s $33 per vehicle to enter Arches National Park. If you’re also seeing Canyonlands, consider purchasing a Southeast Utah National Parks pass for $55. If you know you’ll be visiting three or more National Parks within the year, I’d recommend getting the America the Beautiful pass, which provides access to up to 2,000 federal recreation sites (doubling as a National Forest pass). It’s $80 and is good for a year from the time of purchase.
Facilities
There are restrooms and water spigots–the latter available only in the warmer months–throughout the park. There are no gas stations, grocery stores, or restaurants, so pack in all your food and arrive with a full tank of gas!
Cell Service
It’s limited, so don’t rely on it! Download your trail guides and maps before arrival (AllTrails and Maps.Me allows offline use for a small fee). You can also download my 24 Hours in Arches National Park itinerary here to use it offline during your visit.

How Are Arches Created?
65 million years ago, Arches National Park was a dry seabed. Then, geologic forces wrinkled and squished the landscape, pushing sandstone into each other and forcing it upward. The entire region then began to rise to thousands of feet above sea level, and erosion began carving the sandstone down, giving deeply buried sandstone layers some flex room to expand up and out (nps.gov compares it to a sponge after the water’s been squeezed out).
Today, water is the biggest cause of erosion, seeping into cracks, freezing, expanding, and melting. Eventually, these sandstone rocks turn into “fins,” or large, vertical fin-shaped slabs of sandstone, and fins eventually turn into arches.
Arches can also be created when potholes near cliff edges wear through the wall below them. Nps.gov states that these same forces are what will cause the arches to collapse someday, and new ones to form.

What Makes Them Red?
There’s a ton of iron in this sandstone, and when it oxidizes, it turns red, just like rusty nails!

What Are Considered the Park’s Best Arches?
Delicate Arch
Distance: 3.4 miles RT
Elevation: 626’
Rated: Moderate
Easily the most visited of all 2,000 in the park, hiking to Delicate Arch is the #1 must-do attraction in the entire park, and it sure was impressive! It’s so famous, you can refer to it as “The Arch” and most will know exactly what you’re talking about. It’s larger than life, extending thousands of feet into the sky out of a basin of smooth red rock. Majestic is an understatement.
There are three ways to experience Delicate Arch: The Lower Viewpoint, Upper Viewpoint, and the Delicate Arch Trail. We chose to do two out of the three.
The Lower Viewpoint: What to Expect
The Lower Viewpoint is a short wheelchair-accessible 50-yard trail–short enough to get a quick sneak peek at the far-away arch in just a couple of minutes. We stopped here first before heading back to the Delicate Arch Trailhead for sunset in Arches National Park.
The Delicate Arch Trail: What to Expect

Right off the bat you’ll see an original homestead. Definitely take that tiny detour to get a peek into the past! After the bridge, I highly recommend veering left at the fork for a 0.2-mile loop past incredibly preserved Ute petroglyphs. Back on the main trail, you’ll encounter your first of two steep switchbacks, but don’t worry! Aside from a few exceptions, most of the trail is a steady climb to the top.
After weaving your way through shrubbery, you’ll begin walking up a massive slab of sandstone with no clear trail. Keep an eye out for wooden signs that will point you in the right direction. If you’re walking at night, bring a headlamp so you don’t miss them. It’s easy to get lost on trails like these and we don’t want that!

More weaving through shrubbery and a few smaller sandstone formations until you find yourself hugging a cliff to the right and a massive basin to the left. This is the last stretch of trail before it opens up into a massive, wind-blown sandstone basin with Delicate Arch sitting pretty and proud smack in the middle.

How to get there:
From the Visitor’s Center, drive 11.5 miles before taking a right onto Delicate Arch Rd. You’ll arrive at the trailhead after 1.2 miles. To check out the Upper and Lower Viewpoint trails, continue down Delicate Arch Rd past the trailhead for another 1.1 miles.

The money shot:
Head to top west side of the basin for the popular shot of the arch with the mountains behind. After experiencing the arch up close and personal, I joined about six or seven other photographers to capture the glowing arch, courtesy of the sunset.

When to visit: Sunset. The golden-hour light sets both the red rock and the distant mountains aglow in a way that’s nearly impossible to describe.

Length: 1.9 miles RT
Elevation: 259’
Difficulty: Easy
The Landscape Arch is a stop on the longer 7.8-mile Devil’s Garden Loop, which I hear is a must-do if you have the time! Since we only have 24 hours to explore the park, we chose to stick with the main attraction: The Landscape Arch. That said, there are three more arches along the way, so keep an eye out and venture down the short 0.1-mile side trails if you’d like!
The Landscape Arch: What to Expect
The trail beings in a canyon, steep red rock referred to as “fins” on each side guide you along the trail. Fins are how most arches begin: they’re thin slabs of sandstone that eventually get weathered away by wind to create an arch formation. You’re in the presence of TONS of future arches. How cool is that?
Don’t forget to look down! There’s tons of awesome flora that might be different from what your’e used to!
Plants to look for:

Cacti
Blackbrush
Purple sage
Moss
Yuccas
Monkeyflower
Wildflowers
Columbine
At 0.2 miles, you’ll see an off-shoot to the right. This leads to three more arches–Tunnel Arch, Pine Tree Arch, and all within 0.1 miles of each other. Check them out if you have the time!
The entire trail to Landscape Arch is gorgeous with expansive views of strikingly red and orange fins, pinnacles, and arches each step of the way. At 0.85 miles, look up!! The Landscape Arch is tucked in a cove and surrounded by greenery. It’s massive to say the least, even after a large chunk of it fell a couple of years back. This is a natural process, and eventually the beloved Landscape Arch will be no more, but because its active erosion is a safety hazard, please respect the park’s decision to close the access trailhead, and enjoy the arch safely from the viewpoint. It’s a beaut!
How to Get There:
From the Visitor’s Center, drive 16.1 miles until you reach a dead end parking lot. You have arrived!

Best Time to Go:
Anytime! We did this arch second but because it’s tucked away, lighting won’t make that much of a difference in your photos.

Distance: 1.2-mile Loop (if you do the primitive trail too!)
Elevation: 154’
Difficulty: Easy
Three arches in a 1.2-mile loop? Yes, please! Not to mention, this is a great place to spend sunrise. I’ll explain why.
What to Expect:
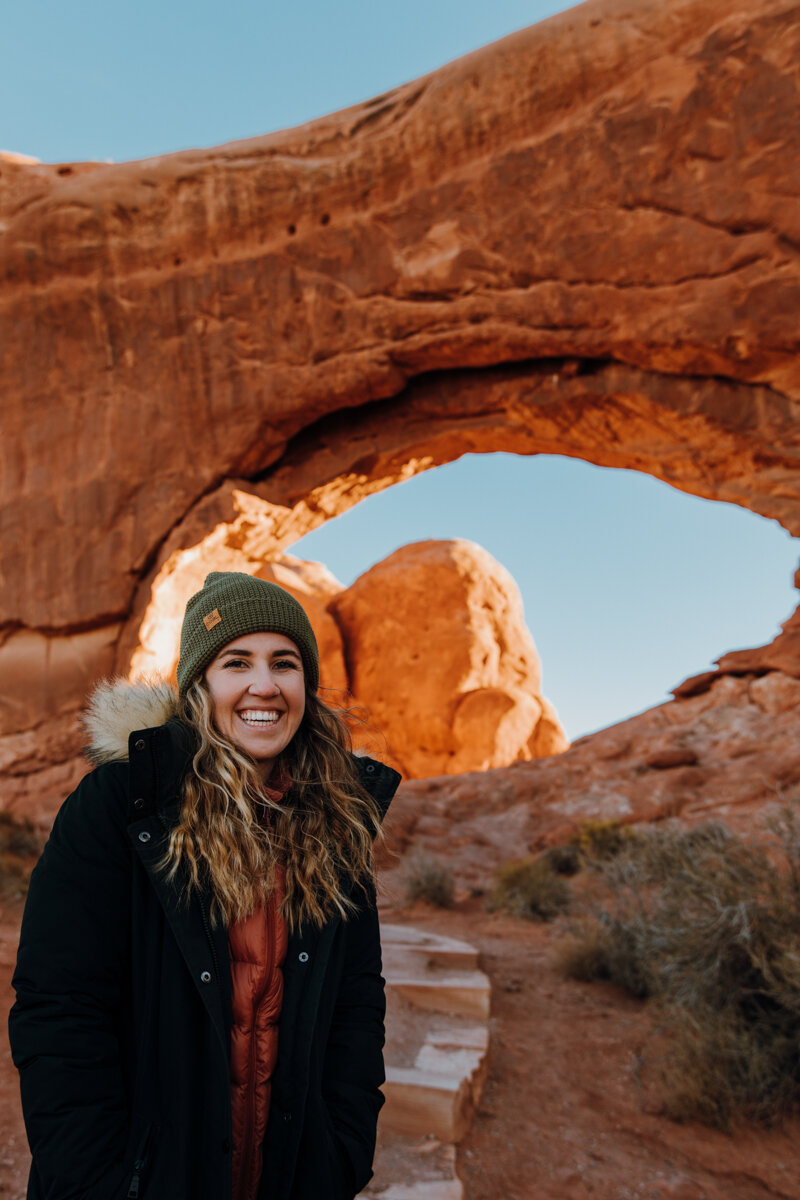
This trail shares the parking lot with the Double Arch, which is next on our list! All the arches, am I right? In just 1.2 miles, you’ll see three different arches. We decided to walk clockwise, starting with the Windows Arches, which sit side by side, cut from the same “fin.”
Continuing clockwise along the loop trail, you’ll stumble upon the South Window Arch, and finally, Turret Arch. The Turret Arch, while relatively small itself, is being carved out of a fin that’s 100’ wide, which means it’s about to be a massiveeee arch in a few thousand years or so, especially if it combines with its smaller arch neighbor.

How to Get There:
From the Visitor’s Center, drive 9.1 miles. After the Balanced Rock, take a right onto The Windows Rd. and continue until you reach the parking lot 1.5 miles later. It’s a dead end, you can’t miss it!

The money shot:
This is for expert hikers only! It’s a primitive trail and involves balance.
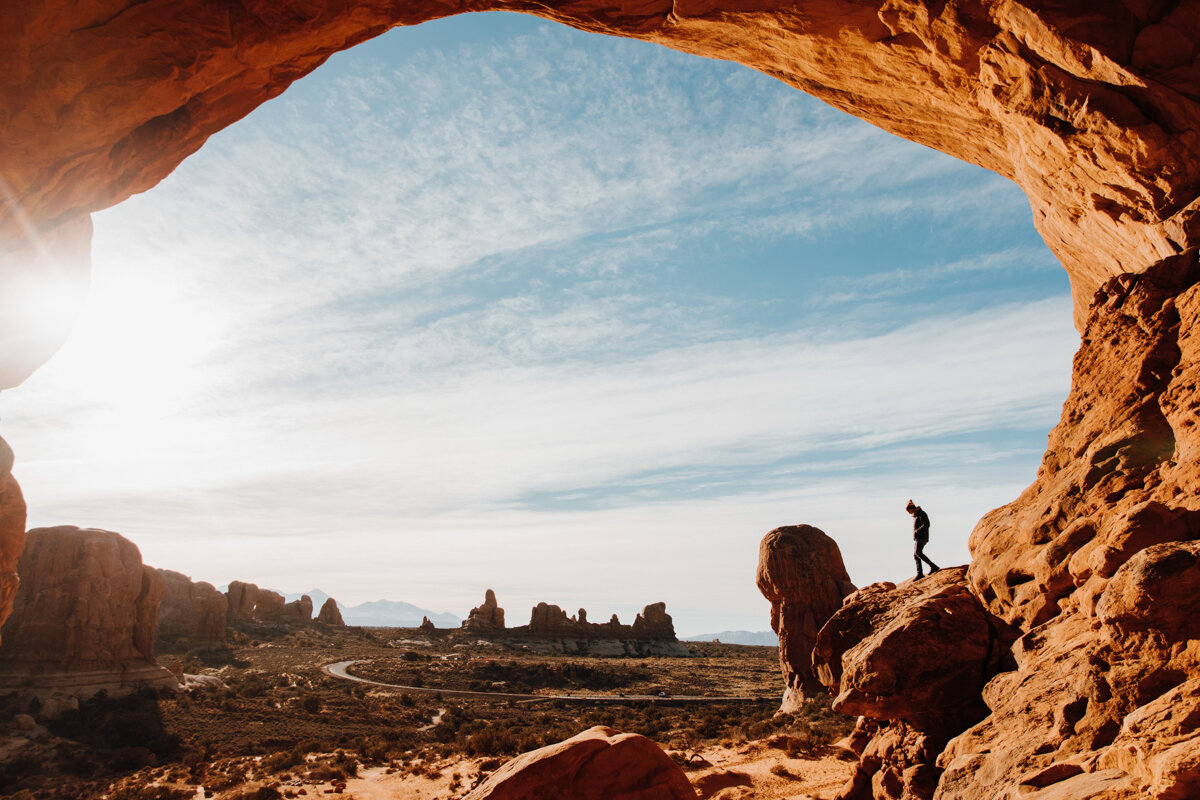
Climb through the North Window. From inside the window, look straight across to find a ledge. This is where you’re headed. Climb down and scramble up the rocks to the left. From the ledge, you’ll see Turret’s Arch through the North Window, which looks pretty dang rad at sunrise.
The ledge is pretty small and high off the ground–I’d say anything over 10 people would make it dangerous. Do not attempt if you’re not confident in your climbing skills or there are 10 or more people on the ledge already.
Best Time to Go:
Sunrise! We spent the morning with a few other photographers at the “Money Shot” location. It was magical to say the least.

Double Arch is the tallest arch in the park at 112’ and the second-longest at 144’, and is freaking cool if I do say so myself. I’ve never felt so tiny. If you don’t want to walk the 0.6-mile RT trail, it’s also visible from the parking lot, which makes it a quick-and-easy must stop for those with limited time.
Don’t miss this arch!
The Double Arch: What to Expect
The Double Arch is in the Windows section of Arches National Park, which has the highest concentration of Arches in the park. The trail is short and gravel with almost no elevation gain (unless you decide to climb up into the arch). It’s more of a stroll if anything.
Two arches formed by downward water erosion created what I’d call a skylight in the middle. I climbed up into the formation for a better look. If you make it up into the second arch, a third arch comes into view.
How to Get There:
From the Visitor’s Center, drive 9.1 miles. After the Balanced Rock, take a right onto The Windows Rd. and continue until you reach the parking lot 1.5 miles later. It’s a dead end, you can’t miss it!
Best Time to Go: Morning!
After spending sunrise at the Windows, we popped over here to check it out. We were the only ones there!

Other Arches and Landmarks of Note:
Balancing Rock
Garden of Eden
Fin Canyon
Black Cave Arch
Crystal Arch

Check out the map below for all my favorite things to do in Arches National Park.
Legend:
Purple camera: Photo opps from your car
Orange camera: Photo opps via a hike
Hiker: Trails I love
Where to Stay
Camp
The Devil’s Campground is the only campground in Arches National Park. They accept reservations six months in advance for those wanting to camp between March 1 and October 31 and is typically full every night. Between November and February, campsites are first-come, first-served. Make your reservation here!
Nightly Rate: $25
Under Canvas
This is a truly remarkable glamping experience, just 9 minutes outside of the park! Under Canvas’ luxury tents all come with either a Queen or King-size bed and a wood stove with complimentary firewood. USB battery packs allow you to stay charged, and grab ‘n go snacks are available to those who stay. Some tents have lounge areas, decks, and private bathrooms, and all have access to public fire pits with s’mores and picnic areas with BBQs. Not to mention, they’re GORGEOUS! And yes, that’s West Elm furniture.
Open: March 4th – October 25th
Nightly Rate: ~$350
Gonzo Inn
The Gonzo Inn is one of the more fun and quirky hotels near Arches National Park. It’s in central Moab within walking distance of plenty of restaurants and attractions.
Nightly Rate: ~$300
Red Cliffs Lodge
I did a double take when I drove by the Red Cliffs Lodge, just outside of Moab on the banks of the Colorado River. This hotel near Arches National Park has massive slabs of red rock extend into the sky beyond, and tons of little cabins offer a remote and quiet place to rest your head and get back in touch with nature.
Nightly Rate: ~$180
What to Pack
Layers
Moisture-wicking tank (merino wool works best)
Moisture-wicking longsleeve
Insulating layer: I wore my puffer almost the entire time it was chilly! It’s a windbreaker and its down fill kept me warm.
Shorts
Hiking pants and/or leggings
Hiking boots: I LOVE my Danner’s. They’re light, super comfortable, have great traction which was perfect for the slick sandstone, and come with cute red laces :)
Wool hiking socks. Check out this sweet design.
Beanie for those colder evenings
Baseball cap: they’re great for keeping the sun and rain off your face!
Sunglasses
Sunscreen
Snacks. Again, there are no restaurants or grocery stores, so bring all the food you’ll need for the day! I packed breakfast from the hotel, coffee to make post-sunrise hike, sandwiches for lunch, beef jerky and oranges, and ramen for a hot dinner.
Camp stove
Lighter
A full tank of gas
REMEMBER TO LEAVE NO TRACE
These gorgeous ecosystems are delicate and require a little conscious care from us visitors to help maintain a balanced and healthy environment, which also lets us to enjoy the wildflowers, wildlife, and vast landscapes for years to come.
Leave No Trace features seven core principles for responsible outdoor recreation. It's our responsibility to follow them and practice good stewardship on every adventure. For more information, please visit The Leave No Trace Center for Outdoor Ethics website linked here.
THE SEVEN PRINCIPLES
Plan and Prepare
Travel and Camp on Durable Surfaces
Dispose of Waste Properly
Leave What You Find
Minimize Campfire Impacts
Respect Wildlife
Be Considerate of Other Visitors
Read more about the LNT principles here.
Now, get after it!
