The Beginner's Guide to Adventure Travel Photography: Best Camera for Backpacking Plus Tips for Better Pics
You made it. You hiked mile after mile, avoided rogue roots and stopped to smell the wildflowers, and you're finally here. Maybe "here" is a waterfall, a mountain peak, a canyon, or a beach–whatever it is, it's likely epic (as nature as always is) and well deserving of a photo. So, you pull out your camera to snap a quick shot, only to get home and realize it's blurry, or the sun silhouetted your friend, or you just don't love it. UGH. I know the feeling.
If you're ready to amp up your photo game with hiking photos you'll LOVE, then you're in the right place. Here's a guide to the best cameras for beginners along with 10 totally achievable tips to take better photos on your next adventure.
Hey, friends! I love recommending the gear that I'm stoked about and use on the regular. As such, this post contains affiliate links to some of the products I love, and I'll receive commission upon any purchases made through those links.

Table of Contents
What Camera Should I Buy?
STOP! Before you make any type of investment, rent first!! I mean, how awful would it be to put down some serious dough for a camera you end up not totally loving? Renting allows you to try multiple cameras (and lenses) for relatively cheap so you get a good feel for what you like before you buy. You'll know what you look soon enough, and then you'll be ready to make that serious investment in a baby of your own!
Where Should I Rent?
If you're in Seattle, Glazers is my go-to for all my camera gear rentals.
Pro tip: Rent on Fridays to get the whole weekend to play around with your gear for a single day's rate! (They're closed weekends). Such a steal.
Don't want to show up for in-person pickup? Adorama is a great company that sends rentals to your doorstep.
What Spec's Should I Look For?
Comparing every single little detail can get to be super overwhelming, I get it! Here's what's most important when camera shopping:
Megapixels: These are usually one of the first numbers listed and refer to how many hundreds of pixels your sensor is able to capture. The more pixels, the more detail, the higher the resolution. You'll know it's professional grade if it's 20 megapixels or above.
Mirrorless or Not? Mirrorless cameras (like the Sony listed below) don't have mirrors, which means they tend to be lighter, more compact, and have faster and better video capabilities, but they also have fewer lenses and accessories than DSLRs. Fewer components means you can capture more images faster (11 fps vs 5 fps in the two cameras above). It also sports a digital viewfinder, which means your final image will be pretty dang close to what you see in the viewfinder, but overall, it tends to be more tough to capture photos in low-light scenarios compared to DSLRs. Battery life is short, but improving.
Sensor size: A full frame sensor measures 36mm x 24mm and captures more of a scene than APS-C sensors, which is why APS-C sensors (measuring 22mm x 15mm) are often referred to as "cropped sensors." Most professional cameras sport a full frame sensor to capture a wider view and are typically more expensive. Many "beginner" cameras have APS-C sensors.
ISO: This is how well the camera will do in low-light situations. The higher the number, the better it does in low light. Comparing the two cameras below, you'll see the Sony has a higher ISO number of 32,000, compared to Canon's 12,800, which means Sony will typically be better for late night photography.
Frames Per Second: If you're going to be shooting a lot of fast-action sports or speedy wildlife, take into account how many frames per second your camera can achieve. The higher the number, the faster it is.
What Cameras Should I Look At?
My rec's for beginners:

Price: ~$530
24.2 Megapixels CMOS (APS-C) sensor
ISO 100–12800
MP4 video
Canon DIGIC 6 Image Processor
Built-in wifi for quick photo transfer to phone
Hybrid CMOS AF III (fast autofocus)
Vari-angle Touch Screen 3.0-inch ClearView II LCD with tilt for crazy angles
Shoots up to 5 frames per second for fast action shots
Minimizes the effects of fluorescent light
19-point all cross-type AF system

Price: ~$750
24.2 Megapixels CMOS (APS-C) Sensor (smooth image quality with minimal noise)
ISO 100-32000
UHD 4K30p and Full HD 120p Video
BIONZ X Image Processor
Built-in wifi (for quick photo transfer to phone)
Shoots up to 11 frames per second (for fast action shots)
921.6k-dot touchscreen LCD with tilt for crazy angles
4D FOCUS system incorporates 425 on-chip phase-detection points along with 425 contrast-detection areas for fast and precise focusing
1.44m-dot OLED electronic viewfinder (allows real-time image preview before the shot is taken).
My first "big girl" camera was a Canon Rebel T4i–part of Canon's Rebel series–which a great beginner's camera along with the rest of the series. It's a DSLR, which in a nutshell means it records images digitally with the help of a mirror that the camera relies on for focusing, while SLRs record images on film. There are tons of lens options available from all different makers (Sigma Art lenses are my favorites), and your batteries can last for days!
And don't think that you need to jump into manual mode right away! I loved that they also have an auto setting, so if I was feeling stressed and wanted to take just a quick snap of my landscape, I'd flip it over to auto.
What's my current camera? Canon 5D Mark IV
Both cameras definitely have their perks and drawbacks. A few questions to ask yourself when deciding between the two are:
Will you be shooting a lot of video or action shots? (If yes, then consider Sony.)
How important is size? (If you prefer small size for travel, go with Sony.)
How important is lens diversity? (If you're looking to have a variety of lenses, go with Canon.)
Here's a detailed comparison of the two.
Have more questions? Send them to me here!
Now that' you've got your camera all picked out, here are 10 totally achievable tips to use on your next adventure!
1) Plan your adventure around golden/blue hour if you can.
Even if you're not a photographer, you've probably heard about the magic that happens the hour after sunrise and before sunset, otherwise known as golden hour. Many of the scroll-stopping, eye-catching shots of epic landscapes are taken at golden hour for its warm, glowy hues.
But have you heard of blue hour? Blue hour happens after the sun dips behind the horizon, where the landscape gets a blue, glowy tint from the residual sunlight. Many photographers prefer it over golden hour–it can be longer or shorter than an hour or sometimes not happen at all depending on weather conditions, and you most definitely need a tripod to capture it.
Planning your adventures around golden/blue hour can instantly elevate your photos without having to do much else!

2) If you can't make golden hour, go early.
I wake up early for two reasons: 1) If I never went to bed in the first place or 2) for the photos. I'm SO not a morning person, but the only way to get those super glassy lake photos is bright and early during the calmest part of the day. AND you avoid the crowds, which means less photo bombers.

Shot underexposed in midday harsh lighting to preserve detail in the dirt.
3) Try to keep the sun behind your subjects.
I know, completely opposite from everything you've ever been taught, right? You're thinking your friends will be silhouetted, right? Well, would you believe me if I told you we actually want your friends to be silhouetted in this case? I challenge you to go back to your silhouetted photos from past adventures, bring them into Lightroom, VSCO, or any photo editing software, and slide the shadow setting all the way up. BOOM. Magic. You're welcome ;)
This works great for those midday, harsh lighting shots when you find yourself finishing your upward trek right around noon.
Let me explain: Cameras have a really tough time picking up super bright light. If parts of the image are too bright or too white, the camera can't pick up the data at all. Those areas become "washed out" and can't be fixed in post processing (editing) because there is no data to edit. Dark, almost black pixels, on the other hand, are easy for cameras to pick up, so shooting darker on bright days allows the camera to record all the data in the brightly lit parts of the photo and the dark shadows. Then you can lift the shadows in editing for a perfectly exposed image!
E.g. check out my shadow in the photo above. I put the light behind me. In the camera, I was totally dark, along with the shaded parts of the mountains. But after bumping up the shadows, details in my hands and the shaded parts of the mountains appeared. It's that simple!

4) Bring a Tripod
When I run into a waterfall or watch sunset at the beach, you bet your butt I'm taking a milky, long exposure photo, and a tripod makes this 1000000x easier. If you're looking for a super compact, lightweight tripod, check out the GorillaPod 5K Kit. On the hunt for something a little sturdier with height adjustments? I love my MeFoto Roadtrip Classic Lightweight tripod.
Pro Tip: How to take a long exposure:
Mount your camera on a tripod or set it down on a rock or another secure surface.
Set a 2-second timer.
Set your shutter speed between 5 and 30 seconds. (If you have shutter priority mode, or the "S", try that out if you're not keen on using manual yet.)
Your f-stop will likely need to be in the low single digits if you're shooting in daylight. Add a neutral density filter (more information below) to allow a deeper depth of field for bigger landscapes in bright light.
Hit the shutter and step away from the camera as the timer counts down. This will eliminate any camera shake caused by your hands.


5) Consider Purchasing a Neutral Density (ND) Filter
Neutral density filters reduce the amount of light that enters your lens. Less light means you can slow your shutter speed, which will allow you to get those super milky waterfalls or shoreline shots in the harshest, brightest light. It's totally worth it if you're traveling and can't plan your destinations around golden hour.
Pro tip: Purchase the filters to fit your biggest lens, then purchase a ring adaptor set so you'll only ever need to purchase one filter for all of your lenses!

6) Invest in a comfortable and durable camera bag.
Carrying your camera by a shoulder strap is great for shorter hikes, but if you're hiking miles with water, snacks, and other items, consider getting yourself a camera backpack that does it all. I take my 21-litre Wandrd Prvke Series Backpack on every adventure. Make sure you add on the photography bundle, which comes with a camera cube, straps so you can wear it on your chest and change lenses easily, waist straps to take some camera weight off my shoulders, and a rain fly to further protect the backpack's water resistant surface. HIGHLY recommend. The camera cube is also removable, which instantly converts your camera bag into an adventure backpack if you decide to leave your camera behind one day.
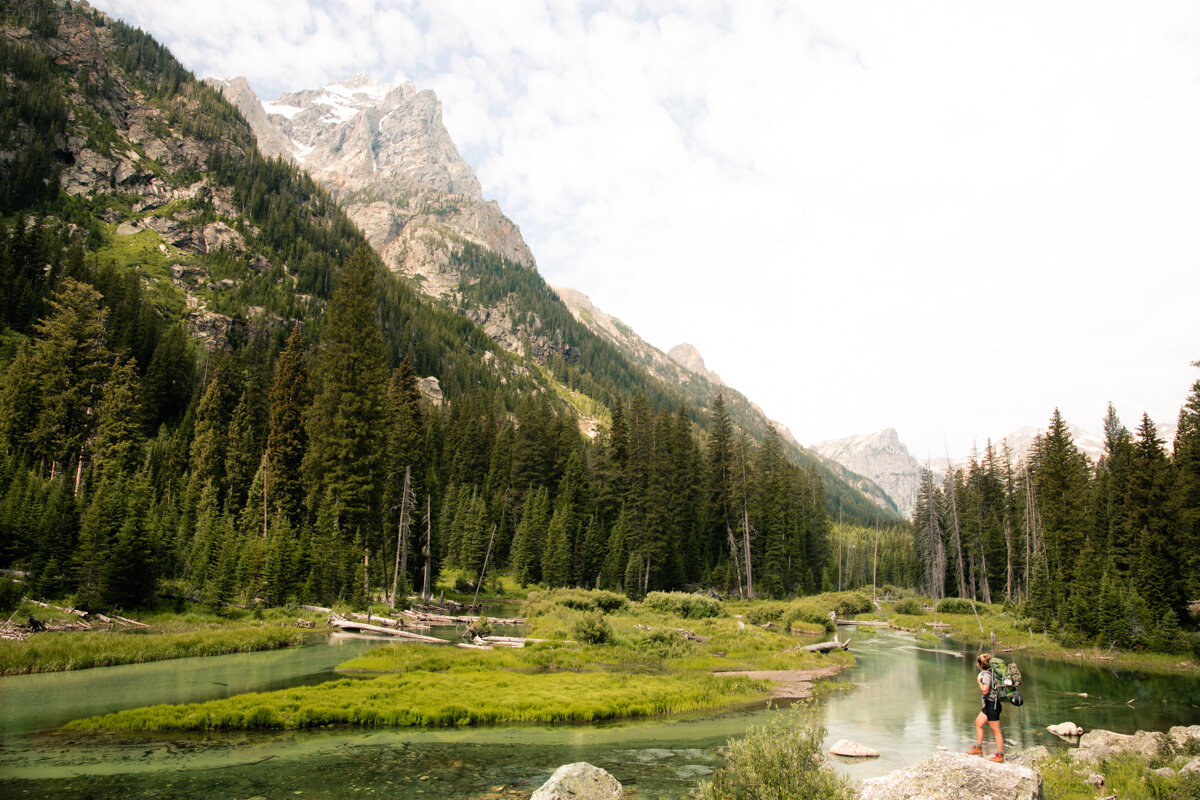
7) Add a human touch (with bright colors if possible).
Do you ever feel humbled by how massive nature truly is? I do alllll the time. When I'm standing next to a groaning glacier, or find myself atop a mountain peak, I'm reminded how small I really am. You try to snap a pic, but capturing that scale proves to be super difficult. My advice? Tell your friend to go walk along the ridgeline. It'll add another layer to your photo and give the viewer a better idea of what kind of scale they're looking at. Bright colors will add an extra pop to the image that'll take your photos to the next level.

This is a classic example of the "rule of thirds."
8) Try out the rule of thirds.
Love this concept, hate that it uses the word "rule." Let's be honest, there are no rules in photography. It's an art, and a lot of the world's best photographers are where they are by just messing around. Rant aside, this "rule" gives us a starting point to stray away from the "bullseye" habit–putting your subject in the center of the frame every single time. Amp up your photos by changing your angles.
Try this: Next time you're out and about, stand in one place–you can do a 360, just don't step away from your little circle–and take photos from every.single.angle. Straight up, from eye level, waist level, squatted, from the ground, from the ground up, etc. You'll probably get some sick shots you never could've imagined!

9) Action shots are your friend.
There was a time in my life where every single hiking photo was me cheesing in front of a dope view. Don't get me wrong, those are great to let all my Facebook friends and family know what's up, and I definitely still take at least one of these on every adventure, but it wasn't doing anything to further my photography skills (or my IG likes, tbh).
Challenge yourself to get more action shots on your next adventure, meaning take photos of your friends hiking up the trail or walking along the view, whether that be a waterfall, wildflower field, vista, etc., pulling out their snacks, drinking water, and the like. These lifestyle shots will get you a super diverse gallery and will bring back all the mems when you reminisce one day.

10) Dress in Layers
What does this have to do with photography? Everything. If you're not comfortable, the last thing you're going to want to do is stand for 30-second increments to get a long exposure of the water lapping on the beach as the wind pelts you from every angle. Not fun. BUT if you have cozy socks, the correct boots, warm leggings/pants, a moisture-wicking SmartWool tee or long sleeve, an insulating layer, a shell for the wind, and a beanie, and touch-screen gloves, you'll be extra toasty in even the worst conditions. If it gets nice, strip off a few layers.
Here's what I'd recommend on a cold-weather hike/shoot.
Head:
I never leave the house without my light brown Carhartt beanie. Heat escapes from your head, so trap that in with something warm!
Upper Body:
I usually wear a smartwool quarter zip. This one's currently 25% off! - I just picked up this puffer from REI and I love it!! It squishes up tiny for easy packing and it's super light! It's also on sale for $70 from $100.
For summer hikes, I love my Cotopaxi windbreaker. In the winter, I use my Patagonia Snowbelle snowboarding jacket as an insulating layer, raincoat/windbreaker (also on sale for 30% off!!).
The hands require nothing fancy, just something to warm those extremities. I picked up some very basic touch-screen-optimized gloves to layer underneath my Flylow winter mittens and they work wonders! Some hand warmers never hurt either!
Lower Body:
As for pants, I'm usually okay with a light fleece-lined legging like CRZ's from Amazon. They're only $28 and feel just like Lulus.
Feet:
You can rep the PNW with a pair of From the Ground Up Socks. They come in Mt. Rainier, the Fremont Fire Lookout, the Cascade Range, Mt. Baker, and other iconic PNW designs, while also sporting anti-microbial and moisture wicking material that is odor and blister resistant. Yaassss pleaseeee.
I just invested in a new pair of Danner boots and I'm IN LOVE. Seriously. With no break-in time, these babies are so freaking comfy, light, waterproof, and have mad grip.
